


Homemade Marshmallows with Simple Ingredients
- Mar 24
- 4 min read
Updated: Apr 2
Making marshmallows at home might seem like a challenge, but with just a few basic ingredients and some patience, you can create fluffy, delicious treats that beat store-bought versions in taste and texture. This post will walk you through the process of making homemade marshmallows using only six tablespoons of grass-fed gelatin (or half a cup), one and a half cups of water divided, four cups of sugar, a dash of salt, and vanilla. To be clear, this is a double batch and great for a 1/2 sheet pan to make flatter marshmallows that I use for coffee and the kids use for hot chocolate. These simple ingredients come together to create a sweet, airy delight perfect for snacking, hot drinks, or desserts.

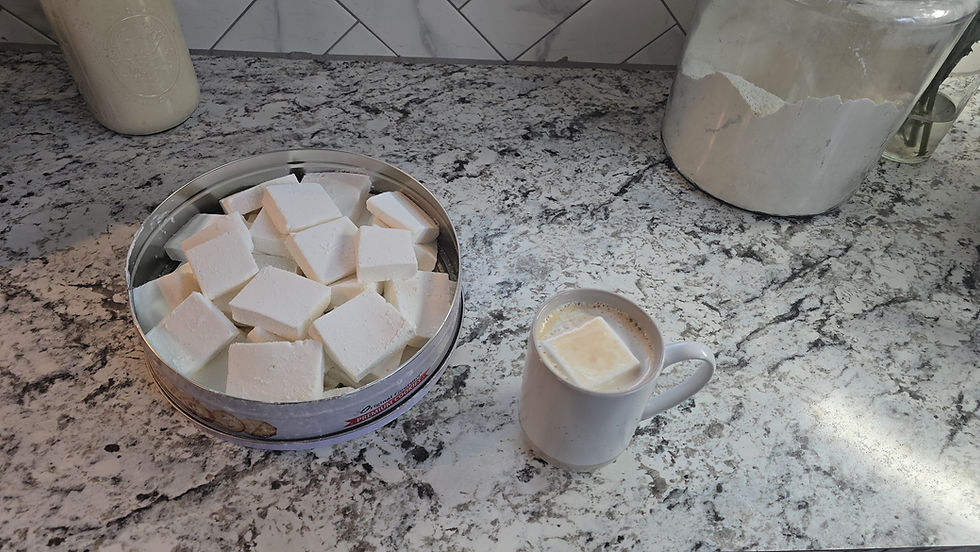
Fresh homemade marshmallows ready to enjoy
Why Make Marshmallows at Home?
Store-bought marshmallows often contain additives, preservatives, and artificial flavors. Making your own lets you control the ingredients, ensuring a cleaner, more natural treat. Using grass-fed gelatin adds a quality protein source and supports sustainable farming practices. Plus, homemade marshmallows have a soft, pillowy texture that melts in your mouth, unlike many commercial versions.
Homemade marshmallows also allow for customization. You can add flavors like vanilla, peppermint, or even cocoa powder. You can shape them into fun sizes or coat them with different toppings like cocoa, cinnamon, or shredded coconut.
Ingredients and Tools You Will Need
Ingredients
6 tablespoons grass-fed gelatin (or 1/2 cup if using powdered form)
1 1/2 cups water, divided (1 cup + 1/2 cup)
4 cups granulated sugar
Dash of salt
1 teaspoon pure vanilla extract
Tools
Stand mixer or hand mixer with a large bowl
Candy thermometer
Saucepan
Sifter or fine mesh strainer (for dusting)
1/2 sheet pan (18 x 23 inches works well)
Parchment paper with oil, butter or non stick spray
Spatula
Step-by-Step Instructions for Perfect Marshmallows
1. Bloom the Gelatin
Start by pouring 1/2 cup of cold water into your mixing bowl. Sprinkle the gelatin evenly over the water’s surface. Let it sit for about 10 minutes. This process, called blooming, allows the gelatin to absorb water and swell, which is essential for the marshmallows’ structure.
2. Prepare the Sugar Syrup
In a medium saucepan, combine the remaining 1 cup of water, sugar, and a dash of salt. Heat over medium heat, stirring gently until the sugar dissolves. Attach your candy thermometer to the side of the pan and let the mixture boil without stirring until it reaches 240°F (115°C). I having been doing this so long that I eye ball it.
3. Combine Gelatin and Sugar Syrup
Once the sugar syrup reaches 240°F, or is dissolved remove it from heat immediately. Turn your mixer on low speed and slowly pour the hot syrup into the bloomed gelatin. Be careful to avoid splashing. Gradually increase the mixer speed to high. Honestly after you do this for a while you will realize when the sugar dissolves and you have reached the soft ball stage. If you remove before then the marshmallows will be grainy. If you do it after they will be really firm. Like baby bear, it has to be "just right".
4. Whip Until Fluffy
Whip the mixture on high for about 10 minutes. The mixture will thicken, become glossy, and increase in volume. When it forms stiff, shiny peaks, add the vanilla extract and mix for another 30 seconds to combine.
5. Pour and Set
Line your baking pan with parchment paper or lightly grease it. Pour the marshmallow mixture into the pan and use a spatula to smooth the surface evenly. Dust the top with powdered sugar or a mix of cornstarch and powdered sugar to prevent sticking.
Let the marshmallows set at room temperature for at least 4 hours or overnight. This resting time allows them to firm up properly.
6. Cut and Store
Once set, lift the marshmallow slab out of the pan using the parchment paper. Use a sharp knife or pizza cutter dusted with powdered sugar to cut into squares or desired shapes. Toss the cut pieces in more powdered sugar to coat all sides and prevent sticking.
Store your homemade marshmallows in an airtight container at room temperature. They stay fresh for up to two weeks.
Tips for Success and Variations
Use a candy thermometer: Accurate temperature is key to avoid marshmallows that are too soft or too hard.
Grass-fed gelatin: This type of gelatin tends to have a cleaner taste and better texture and better for you!
Flavor variations: Add peppermint extract, almond extract, or cocoa powder during the whipping stage for different flavors.
Coloring: Use natural food coloring or a few drops of gel food coloring to make colorful marshmallows.
Toppings: Roll marshmallows in toasted coconut, cinnamon sugar, or crushed nuts for extra texture and flavor.
Common Challenges and How to Fix Them
Marshmallows too sticky: Dust generously with powdered sugar or cornstarch mix.
Marshmallows too hard: Check your sugar syrup temperature; it might have been cooked too long.
Marshmallows not setting: Ensure gelatin is fresh and fully bloomed. Also, allow enough time to set.
Grainy texture: Stir sugar syrup gently and avoid crystallization by not stirring once boiling starts.
Why Grass-Fed Gelatin Matters
Grass-fed gelatin comes from animals raised on natural diets without hormones or antibiotics. It contains more beneficial amino acids and has a richer flavor. Using grass-fed gelatin in your marshmallows not only improves texture but also supports ethical farming practices.
Creative Ways to Enjoy Homemade Marshmallows
Add them to hot chocolate/coffee for a rich, creamy topping.
Use them in s’mores with graham crackers and chocolate.
Melt them into frosting or dessert sauces.
Gift them in decorative jars for holidays or special occasions.
Use them as a topping on cakes, cupcakes, or ice cream.
You can easily cut this recipe in half and make less. In our house they go pretty quickly so it saves me some time to use this recipe. Enjoy!
Comments